Air Barriers – How and why to wrap your home.
Before I start, keep in mind that every environment is different, if you live in Canada, you have different climate and code considerations from Florida, and I don’t have a clue what half of those are. I practice in the Mid-Atlantic, and while much of what I say may apply in other climates, as always, if you’re not living in one, consult a local professional to be sure my advice is correct for you.
So, the other day, I wrote a post about how energy leaves/enters your house, and I mentioned air barriers or infiltration barriers as your home’s number one defense against air infiltration (the last line of defense is caulk, you should never rely on caulk to solve a problem, we’ll discuss why later.) After I posted it, I realized that since my target audience isn’t really professionals, that most of you probably have no idea what the heck I’m talking about. So, today, I decided to briefly discuss the types of infiltration barriers out there on the market and some tips to make sure it’s being installed correctly. Keep in mind that all of these systems come with manufacturer written directions, and when in doubt, do something unusual and visit their website and download those instructions, that’s the best way to keep tabs on your contractor if you like really getting into the details. Sometimes what is allowed isn’t always best, and I’ll try to tell you when I’m getting on a soapbox rather than just giving you the facts.
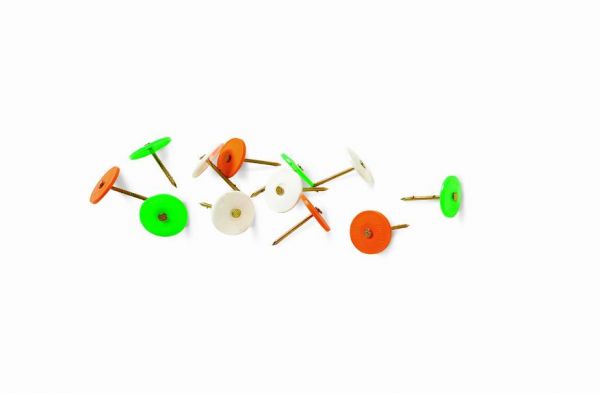
Option 1: The ubiquitous Tyvek. Tyvek is actually a Dupont brand name, and non-woven house wrap (generic name) comes in many flavors. Manufacturers such as Benjamin Obdyke and Typar have their own versions and many larger contractors get a version with their logo printed all over it. In general, it’s a papery feeling plastic fabric that comes on a large roll and the contractor has a couple of low men on the totem pole wrap the whole house in it. This used to be pretty much the only method in use. It’s relatively labor intensive and doesn’t offer any value at all if installed improperly, as it often is. One of the biggest problems is using the wrong fasteners, at the right are the correct fasteners. They’re nails with little rubber caps that provide a seal when driven. Most manufacturers will not allow you to use regular nails or roofing nails as they do not provide a tight enough seal and allow air through the barrier. Many will allow staples for some reason, however, I personally frown on that method and won’t accept it on projects I’m in charge of. All the seams, and any tears, must be taped. This is the second big error, and if you don’t tape the seams, your air barrier is more like a sail with a giant rip down the middle of it. The last issue is the detailing at openings or between levels of the wrap. The detailing is pretty technical and I’m not going to go through it here, but the general principals that must be followed are simple. All joints should be lapped so that water sheds, i.e. the layer above laps overtop of the layer below so water naturally flows over the seam and all joints should be allow water that does get trapped behind the barrier a pathway out. Very often, the cause of the rotten framing is a poor flashing or barrier installation that traps water someplace it shouldn’t be which then requires the services from companies such as this ServiceMaster in Chicago, Illinois or other companies in other locations to conduct water damage restoration.
Option 2: Spray or fluid applied. This is an air barrier that works like a very thick paint. It’s not especially common in residential work, but you do start to see it more and more in commercial, probably because it’s a lot easier on the labor, especially when you’re 4-5 floors above the ground. You apply the “paint” over the sheathing and then provide self-adhearing flashing and/or metal sills (depending on what your local code enforcement officer will require) at the openings. The benefit of this method is that the systems are often self sealing around small penetrations, much lower labor costs (although much higher material costs), and a better adhered barrier for finishes that get secured to the face of the wall with some type of glue. The disadvantage is that these systems are relatively new and many people are unfamiliar with them which can lead to delays as contractors receive training or code officials demand code compliance reports and warranty requirements and details. There is a system you may have seen that combines these first two options, something called a ZIP panel or ZIP system. These are exterior sheathing panels with the fluid applied by the manufacturer so as you install the sheathing, you’re also installing the infiltration barrier. Once the house is framed, you only have to flash the openings and tape all of the seams. This is nice because you get most of the benefits in a system that’s really easy to use and understand for the builders.
Option 3: Foam Board. This air barrier works a lot like the housewrap, except you do it with panels. You install between 1/4″ to 1″ thick foam insulation boards to the exterior of the house (using the plastic cap nails again) and then tape all of the seams. This system saves on labor if you were planning on installing the insulation anyway, but has the same installation issues as the housewrap. The benefits of this system are that the exterior of the house is now moisture resistant, and the dew point can be moved from inside the wall cavity to inside the insoluble foam board, limiting damage to the insulation and interior environment from condensation of exterior water vapor, and the continuous insulation layer also blocks the thermal bridging of your studs. If you decide to go for this method, it’s important to get a professional, who specialises in roofing austin, or an area near you, to check your roof for signs of damage and repair any damage they find. This is important as most of the energy is lost through the roof, and if there are any cracks or leaks and the foam board gets wet as a result, it will rot, and you will have a dangerous case of mould. Therefore, having your roof checked by a specialist is extremely important when insulating your home. It is also important to note that if you leave the boards exposed to UV too long, they will degrade, making taping of the seams virtually impossible. This method also makes the trim package for the windows and doors non-standard and can cause problems securing the siding and exterior trim to the wall if the proper details aren’t followed. I usually only recommend this option to clients who are looking for extra energy efficiency as it doesn’t offer many benefits over other, more conventional methods.
There are a few foam options, and I’ve seen reflective membranes, and some rainscreen systems, but I have limited experience with these systems so I’m not going to pretend to tell you about them. One thing that is not a barrier that often is used as one is building felt. Building felt was utilized a long time ago as an underlayment, but it does not meet current codes as a weather or infiltration barrier as it does not stop air flow well enough. Some builders still try to use it, and some building officials will still allow you to do so, but be warned, it’s not code compliant. In addition, the asphalt in the felt has been known to eat vinyl nailing flanges which is one of the most common methods of installing windows.
So, when you’re planning your next construction project, you can keep some of these ideas in mind to keep convection from emptying your wallet. And, as always, consult a local professional, like kansas city roofers or window installation services, if you have any questions. They will be happy to help and will do everything to meet your demands in preventing convection issues.
